
One of the most common ways to encourage interaction between users and your business is to include forms on your site. There are many uses for forms: to collect information about the people who visit, to help individuals sign up for your mailing list, to encourage feedback, and even in the creation of a basic pricing sheet.
Sometimes, we get a little overzealous about the forms we create, especially if you haven’t been in the habit of regularly asking your visitors for information. However, if people don’t understand the questions, or are confused about why they’re being asked to provide certain information, they’ll be more likely to simply close out of your site and go somewhere else.
How to include forms on WordPress
There are many plugins available for WordPress, but here at the Academy we are using one in particular. Earlier this year, we took a detailed look at Gravity Forms, a plugin specifically designed to allow WordPress users to create gorgeous, easy-to-use forms:
Gravity Forms is a plugin that pairs perfectly with WordPress, and allows users the ability to design and build forms very quickly with a visual editor tool that intuitively allows users to select and configure fields before integrating the form into a WordPress website. Much like WordPress itself, the concept behind Gravity Forms is to give users the choice of templates, fields, and options, then choose how the audience interacts with those fields and options, in as few steps and as easily as possible.
Thankfully, programs like Gravity Forms make it easier than ever for new users to develop thoughtful forms for their sites. However, there are still a few pointers you’ll want to keep in mind before you post your first form!
As mentioned earlier, there are tons of different types of forms you can implement in your website. This is one reason programs such as Gravity Forms are so helpful: they contain a variety of different fields, which allows users to pick and choose the best options to help them gain the information they need.
You can download the Gravity Forms plugin for WordPress from their official website.
Building a web form with Gravity Forms
Within Gravity Forms, for example, there are three categories of fields: (1) Standard, (2) Advanced, and (3) Post. You also have the option to create a basic (4) Pricing form.
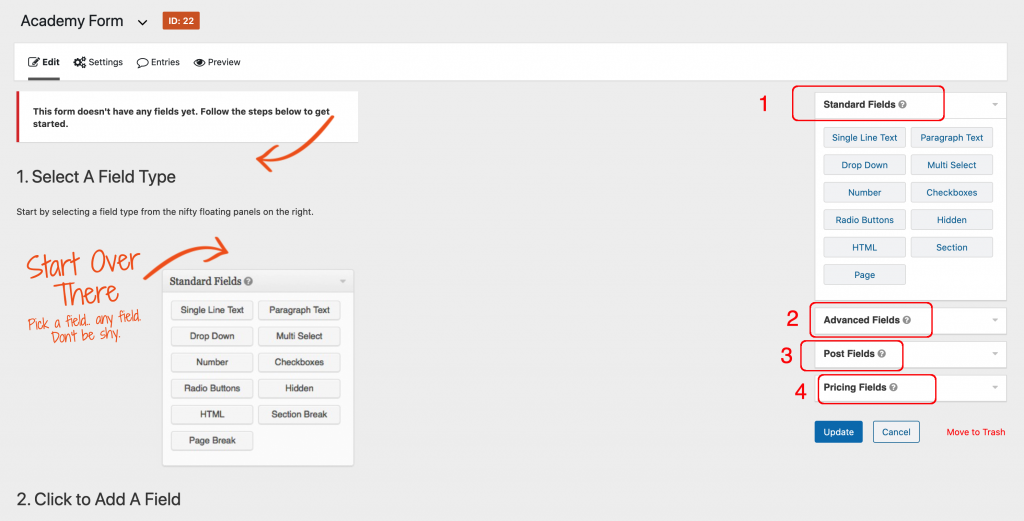
1 – Standard Fields
The first category, Standard fields, is intended for basic forms, and allows users to anonymously check off different options via checkboxes or radio buttons. These types of fields would most likely be used in a survey-type scenario, in which users are encouraged to respond to questions about preferences.
You’ve probably seen several of these forms on-line, with questions such as “Please indicate how likely you are to purchase this product in the next six months” and options such as “Very Likely”, “Somewhat Likely”, etc.
Additional Standard field choices include Single Line Text, which allows a limited free-form response, or Paragraph Text, which gives users the ability to explain their response in more detail. You can also add HTML fields to include images in your form, and Section or Page breaks, to create a visual divide between sections of your form.
2 – Advanced Gravity Forms Fields
The Advanced fields are perfect for those who are looking to capture visitor details, such as for a future mailing list, or a sales promotion. Or, if you are building a squeeze page, to collect lead.
These fields are a great tool to gather information about those who might be interested in a future product release or online course, as well. These fields include options such as Name, Date and Time, Address, Website, and Email address, as well as giving users the chance to set up a password for your site, and verifying their information with a CAPTCHA field.
3 – Post Fields
If you intend to offer the opportunity for others to submit Guest Post ideas to your blog, creating a submission form with Gravity Forms’ Post fields is a simple way to collect all of the details. This avoids anything getting lost in transmission between emails, etc.
Once a user fills out fields such as Post Title, Post Body, Post Tags, Post Image, and more, the results will be saved as a draft that you can then choose to post.
4 – Pricing Fields
Lastly, the Pricing fields will allow you to create a basic order form setting within your website. This can be particularly helpful for a special offer, or a product that you don’t ordinarily offer. Instead of reformatting your entire sales page, you can create a form that details the Product, Quantity, Price, any Shipping or Option notes, and a Total.
How Do I Add a Form to My WordPress Site?
Once you have signed in for an account at Gravity Forms Website, you can download the plugins and install them into your WordPress instance from the administration area (Plugins -> Add New), like with every other plugin.
And as soon as you have installed the Gravity Forms plugin to your WordPress site, the steps to add a form are quite simple. In the WordPress Administration area, there will be now a “Forms” link on the sidebar, with the option to “Add New.” This will open the form builder screen.
This allows you to drag and drop a field from the listing on the form builder screen to the form as you build it. You can update, personalize, and remove as necessary until your form is ready to publish. Adding a field is as simple as dragging it or clicking on it. To edit, just hover the mouse over the field and click “edit”. Deleting is as simple as clicking “delete.”
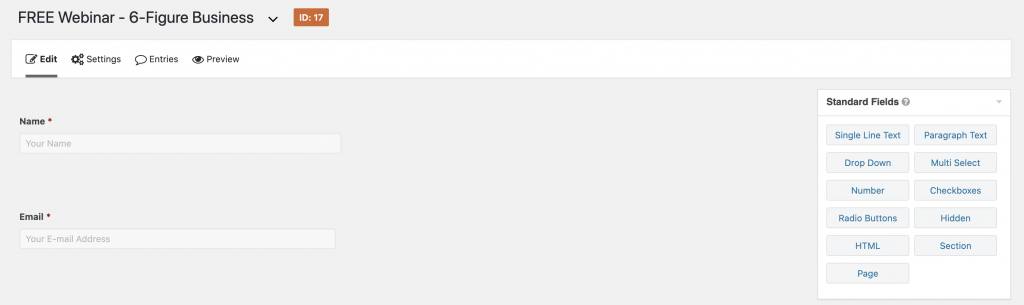
In the image above, we are building a form for a Webinar we are offering to our students. Continue reading to see the final result.
Please note that there are multiple form-building WordPress plugins or software available, some of which may require different steps. If you do not choose Gravity Forms as your form builder, the steps and process may differ slightly. Be sure to check out the instructions and FAQs for your plugin before you install it to make sure the process is something you can easily handle!
What Are Some Things to Keep In Mind?
Since forms are used as a way to allow your customers and visitors to communicate with you directly, you may be tempted to ask everything you’ve ever wanted to know. While it’s true that you can learn a lot about your visitors’ demographics from a form, keep what you’ve learned about User Experience and User Interface in mind.
No matter who your target audience is, they want a form that is short, simple, and makes sense. Most people don’t mind entering a little bit of information manually, especially if it makes sense. For example, if you offer a 20% off discount code for those who simply enter their name and email address, very few people will question why you need that information and proceed.
However, if you start asking for an email address, home address, phone number, and age group, many people will become less comfortable with the form and leave. Asking questions that don’t make sense to the audience will be confusing, and might even make them feel a bit distrustful about a site that asks such seemingly irrelevant and intrusive questions.
Therefore, there are a few rules you should follow to make sure those who open your forms feel comfortable answering the questions.
Be Consistent
Remember, you’re always striving to inspire confidence and trust in your target audience!
First, make sure you request only responses that are relevant to the scenario. If, for example, you’re asking customers to complete a survey of their previous interaction with your website, don’t ask them for their email address or name: you’ve already established that information with the original order.
When in doubt, provide brief and clear explanations to the questions you are asking: “The following questions deal with the timeline of when you placed your order through receipt of the product, in order to help us improve delivery and wait times”, for example.
Additionally, make sure you keep your form as simple as possible by only asking for information you truly need. If you require more detailed information, include paragraph text fields that will allow the user to provide more information as they feel is necessary. This creates a far more streamlined and simple form than asking many questions about a single point.
This is how a form appears into our Webinar squeeze page. Nice result, isn’t it?

A few more suggestions…
Lastly, make sure the form is in an order that is intuitive. Keep similar fields together; don’t jump around from topic to topic.
People are bombarded with hundreds of questions a day, and they are doing you a great favor by answering your questions. Don’t make them think too hard for your advantage. Allow them to scroll or toggle easily through the fields, and include spacing or headers to notify them of transitions in the subject matter, for example, “The following questions are about your satisfaction with our product”.
You might feel a little apprehensive when creating your first form with your WordPress site, but rest assured, the process can be very simple with the help of tools like Gravity Forms. Always err on the side of simplicity, and make sure your visitors understand what is being asked of them. From there, the information you receive will help you better formulate and create future “conversations” with your visitors.
If you want to read our Gravity Forms review, this is the link.